Reduce Clutter & Keep Your Shed Clean with these DIY Storage Hacks
Before you know it, summer is here! Amidst the pretty blue skies and warm weather will be the glaringly obvious, yard work awaiting you. This means over the upcoming months you’ll be in and out of your shed, using tools here and there, moving supplies around, and generally making a mess of things in an attempt to revive your backyard living space.
Wouldn’t it be nice if you could avoid the out-of-control clutter all summer long?
Don’t worry. To help you out we’ve put together a few shed organization hacks to ensure you have a stress-free summer, with a yard to match!
These tips are inexpensive and will make sure your tools, supplies, and other items stay where they belong. Check them out and give them a try at home!
1. Mason Jar and a Lazy Susan
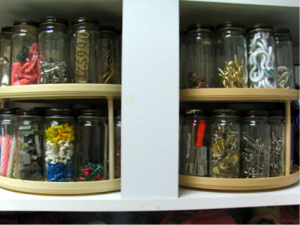 Let’s face it, your shed is the place where all of the miscellaneous possessions ultimately end up. From screws to push pins, nails, glue and outlet plugs, these things add up. With the use of some old jars and a Lazy Susan you can create an easily accessible location for all those pesky objects.
Needed Materials:
-Old jelly or mason jars
– One or two-tiered Lazy Susan –> you can find these at various stores for around $20. Bed Bath & Beyond sells them for $19.99 and Sears for $16.67
credit: Rita May
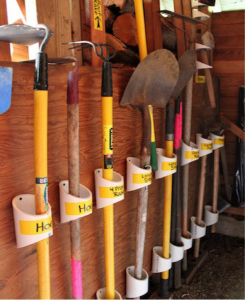
2. PVC Pipes for Long-Handled Tools
If you’re a yard work junkie, then chances are your shed is full of shovels, rakes, cultivators, hoes and more. Things can get messy when storing these in your shed. Simply leaning them up against the wall isn’t the best solution. One great solution for this is mounting pieces of PVC pipes to your shed wall, giving each long-handled tool its place.
Materials needed:
-PVC pipe—the amount depends on how many tools you have
– A piece of ¾ “ plywood
Directions:
1. Cut PVC pipe on an angle – approximately 30 degrees- into 6” pieces
2. Sand of the edges to make smooth
3. Drill the piece of plywood into the shed studs
4. Mark the space where you want the PVC holders to be on the plywood
5. Use one screw and drill into the plywood until PVC holder is secure
credit: Ashbee Design
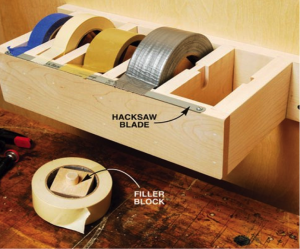
3. All-in-one Tape Dispenser
Do you have a tape problem? Are rolls of duct tape, electrical tape, scotch tape, painter’s tape and more overcrowding your junk drawer? And isn’t it impossible to find the end of the tape on each roll?
Materials Needed:
-Scraps of ¾ “ lumber or plywood
-Hacksaw blade
-Wooden dowel
-Wood glue
-2-3/16 in. wood squares
Directions:
1. Cut the wood the length you prefer- this will vary depending on how many types of tape you have.
2. Use a router or other available tools you have to create slots into the dividers big enough for the dowel to fit.
3. Cut filler blocks into 2-3/16 inches and drill out a hole to fit the wooden dowel
4. Use wood glue to coat the hole, then hammer the wooden dowel into place
5.Nail each slot into a piece of plywood, then cover slots with another piece of ¾ inch wood for the front panel.
5. Align the hacksaw blade on the front of the panel and screw in place
There you have it! A jumbo wooden tape dispenser!
credit: American Woodworker
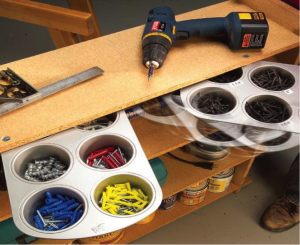
4. Muffin Tin Hardware Organizer
Nothing’s worse than fishing through a cluttered drawer for that right-sized screw. If you’re fed up with trying to organize nails, screws, bolts, washers, and other small pieces of hardware, try using muffin tins!
Materials needed:
-Muffin tins
-1/4-in x 1-1/2 in. flat head machine screw
-1/4 in. fender washers
Directions:
1. Use 6 cup muffin tray that is made from a heavier metal
2. Drill a ¼ inch hole in the shelf top—make sure the top of the screw is flush with the shelf
3. Place ¼ inch fender washers on both sides of the rim of the muffin tin
4. Secure two nuts against each other so that the muffin tin swings but so the threads wont end up loosening over time.
credit:The Family Handyman
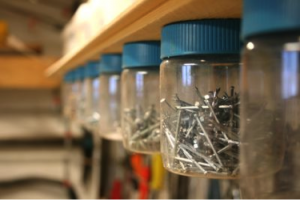
5. Reused Jar Organizers
Not quite sold on the muffin tin idea? Here’s another easy way to keep those tiny doodads organized and out of the way. When you need a bolt, nail, or washer, just unscrew the jar and pick one out!
Materials Needed:
– Plastic jars
– 2 small screws per jar
– Drill
– Wooden Shelf
Directions:
1.Clean out your plastic jars and unscrew their lids.
2.Use a ruler or tape measure to evenly space the lids along the underside of the shelf.
3.Mark each lid by tracing around it.
4.Using a drill, attach the lids to the shelf with two small screws.
5.Mount the shelf and you’re all set!
credit: Chez Larsson
6. Bucket Hose Caddy
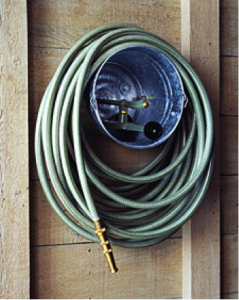 One of the most frustrating things about summer yard work is dealing with tangled hoses. Whether you’re watering the lawn or washing your car, it can be tough to avoid knotting up the hose. Here’s a solution so easy, you’d wonder why you didn’t think of it! Simply attach a bucket to the wall of your shed, wrap your hose around it, then store sprinklers and other hose attachments inside of the bucket!
Materials:
– Galvanized paint bucket
– Drill
– Bolts or screws
– Washers
Directions:
-Drill three holes in a triangular pattern in the bottom of the bucket.
-Bolt or screw the bucket to your shed wall.
-Use sturdy washers to further strengthen the bolts or screws.
-Wrap your hose around the bucket and enjoy.
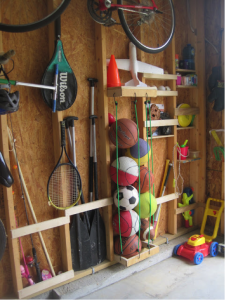
7. Bungee Cord Ball Storage
Here’s an organization hack that will make things easier on you and the kids. In order to keep sports balls out of the way and off the floor. This great idea uses bungee cords for ball storage. With this trick, your kids will easily be able take a ball and put it right back, keeping things organized.
 Materials:
– Slats of lumber
– Nails
– 4 three-foot bungee cords
– Drill
Directions:
1. At the four foot high mark on your shed wall, nail two short slats to the inner side of the studs on your wall.
2. Nail a longer slat of wood to the two shorter slats in order to form a U shape.
3. Repeat this on the bottom of your shed wall.
4. Drill two holes into each of the long slats and drill one hole into each of the short slats.
5. Insert the hooks of the bungee cords into each hole, stretching them between the top and bottom sets of wooden slats.
6. Squeeze your basketballs, kick balls, soccer balls and more between the bungee cords for easy storage!
credit: Designed to Dwell
Do you have your own organization hacks that help you keep your shed clean and tidy?
We’d love to hear them! Post them on our Facebook or Twitter.